on
Building a chording keyboard: progress so far
Chording keyboards have been a computing peripheral for a long time. They’ve been in use at least since Douglas Engelbart gave what is known as The Mother of all Demos in 1968. Rather than try to sum up the history and potential of the device here, I recommend you read the excellent essay Engelbart’s Violin by Stanislav Datskovskiy on loper-os.org
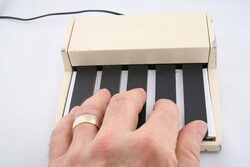
Image via http://research.microsoft.com/en-us/um/people/bibuxton/buxtoncollection/detail.aspx?id=7
I’ve always had an interest in building hardware. When I was younger, I dreamed of building robots some day that I could interact with, play games with, or maybe go to space with. Someday I hope that I’ll get that chance. But in the meantime, I’ve built all sorts of hardware, and I’ve always been interested in the low-level side of computing.
At Bendyworks right now, we have flurry of activity and interest focusing on low-level computing, digital logic, and hardware. We’ve had several discussions in off-hours about learning computing from first principles: digital logic, circuit design, and taking that knowledge to the point of designing and building CPUs and then computers around those novel CPUs. There’s interest in the Arduino and some of my coworkers are taking the so-called nand2tetris course: Building a Modern Computer from First Principles.
We recently built a project at Bendyworks that we call concert_cam, which takes pictures at the Live on King Street concerts outside our office. You can see a gallery the pictures taken at the most recent concert on Facebook. At some point I’ll blog about the concert_cam project and provide some lessons learned.
But for now, I’d like to talk about a project I’ve been working on for awhile: a chording keyboard. I don’t have a clever name for it, so the code currently lives at github.com/mathias/chording. The repo represents only some of the attempts I’ve made at getting it to work. (Code from several other attempts to code a chording keyboard died in a VMware Linux VM that ate its own disk image, and I didn’t commit any of that code. Luckily, that code was mostly things I’d ruled out as possible solutions.)
Building a chording keyboard in software is not trivial, so I have moved on to building one purely in hardware.
Background information
USB devices that we use for input, like mice and keyboards, implement something called USB HID, for Human Interface Device. Linux, Mac OSX and other operating systems have supported USB HID for a long time.
To build a chording keyboard that can work on any computer without special software installed, the device will have to implement USB HID and send the correct key events for a given chord.
There are lots of chording keyboard projects and commercial products out there. To name just a few:
- The Microwriter, which the author of loper-os.org discusses in the essay Engelbart’s Violin, and also covered reverse-engineering.
- The twiddler, which is commercially available. I have used my coworker Chris’s twiddler quite a bit, but couldn’t get over the TV-remote-control ergonomics.
- The tabspace layout for the twidder (PDF link), which is an optimized key map layout for Twiddler.
- The septambic keyer by Steve Mann.
- The chordite keyboard.
- The spaceman spiff layout / spiffchorder project.
- The gkos project to create a software chording keyboard for smartphones.
Ultimately, none of these projects or products really fit what I had in mind for a chording keyboard.
Why a chording keyboard, you might ask?
Well, I spend most of my work day editing text. While I am quite proficient at vim and slowly getting better at emacs, the kinds of key combos that a professional programmer uses daily are quite complex. There is a constant risk of RSI or carpal tunnel (which plagued me in my teens, but I have been free of for over a decade.)
With a chording keyboard, one could take a common key combo that you use all the time and put it under a much easier-to-type chord. This becomes especially attractive to me in replacing some of the key-combos required for operating emacs (especially those that use alt.)
Of course, such a device isn’t designed to completely replace having a keyboard on the desk. Even with a lot of practice, the reality is that I’ll probably continue to be faster at typing words on QWERTY. But having a chording keyboard off the left side, and a mouse on the right, seems to make sense. I am, after all, a software craftsman, and if I feel like I need to build a particular tool (even a physical piece of hardware) to augment my current toolbox, then it makes sense to do it.
For a long time, I have dreamed of a way of being able to record programming language keywords and idioms as macros, as well as methods to type faster. Since I haven’t found any way to train myself to type QWERTY faster, I started to look at alternatives. Learning Dvorak or Colemak might help, but it still doesn’t get me away from the legacy typewriter keyboard design.
And still, those alternative layouts doesn’t get me to the point where I can type out an entire block of code at once. For example, I might want to map a key to output something I frequently type, such as a Javascript anonymous function. Knowing which editor I’m in, I could have the keyboard leave the cursor in the function body, ready to be filled in:
function() {
  _
}
(where the underscore shown is the cursor position)
And lastly, I wanted to build a chording keyboard because it’s cool, it’s different, and because we frequently accept the paradigms handed to us in computing without really thinking about how we might improve or replace them.
To understand chording keyboards best, it is worth noting that while regular keyboards detect the initial key being pressed down, a chording keyboard must detect when all of the keys in a chord are released simultaneously. Due to how fast electronics really are, no human could actually release all of the keys at exactly the same moment. For that reason, we need to implement chording in a way that takes time into account and looks to see if any chord pattern matches in the past n milliseconds.
Brief project history
After reviewing possible hardware to use to build a chording keyboard, I stumbled upon the Razer Nostromo (and its earlier incarnations from Belkin.) These gaming pads are popular with PC gamers because it puts the WASD keys under your left hand and frees your right hand up for the mouse.
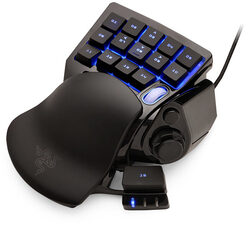
Other features the Nostromo had over other devices were supporting N-key rollover — basically, the ability for the keyboard to know that multiple keys are being pressed at once, and send all of those keys to the computer — as well as a little 4-way directional pad, and blue lights (always a plus!)
The Nostromo also comes with a piece of software that you can install and remap the key mappings with. The key mappings get saved onto the device, meaning the device can operate without the software. The current mode is indicated by three LEDs near the thumb, which count up in binary, yielding 8 key maps. Additionally, any of the keys can trigger a pre-recorded macro of many key events.
Sadly, while the Nostromo software can have one key press trigger a sequence of buttons for you, for example, to macro a complicated action in a game, it did not support detecting a chord (multiple key presses simultaneously) into a single key event. So with that limitation in mind, I set about trying to write code to detect chords and turn them into key presses in software rather than at the hardware layer.
mxk
On Linux, there is a project called mxk. mxk is basically a USB HID swiss army knife and HID event remixer, able to take input from any USB device, run it through various rules, and then output new USB HID events to the USB bus with a “virtual” USB HID device. Many example configuration scripts are provided, and one of the most common use seems to be to create a key press that turns a QWERTY keyboard into a DVORAK keyboard and back again, without having to change the Linux system settings. It seemed promising.
mxk even indicated that it had support for two different kinds of chording: braille keyboard chording and a simpler chord-matching function.
After banging my head against its confusing configuration syntax for about 2 weeks, I determined that mxk just couldn’t do what I wanted. Two issues cropped up: in the braille chording function, only one row of keys was supported and two hands were assumed. (Basically, it wanted ASDF and JKL; keys to form chords, and didn’t support anything else.)
The regular chording functionality seemed like it might work, until I ran into a huge, glaring issue: A key used in one chord couldn’t be used in another. For example, let’s say I’m mapping keys for the left hand on a QWERTY keyboard to be used in a chord. So I might have a chord like RE which maps to ‘a’ and another chord like FE that maps to ‘k’. The E used in both chords didn’t work in mxk. It simply couldn’t support it; it could only watch for unique chords. This limits the key map for a chording keyboard made of a 12-key grid from some 495 combinations to 12, gaining us nothing since individual key presses are just as efficient.
With these limitations discovered, I tried to hack the code for mxk to support my use case better. But, I don’t have much in the way of C chops when it comes to device drivers and pointers, and implementing code against Linux’s libHID is kind of a pain. Further, the mxk source isn’t very well documented, outside of very few comments littered around the code. Additionally, I found libHID’s docs unapproachable.
I realized that I was working at the wrong abstraction level, like so many projects that had frustrated me before. So I decided to move up to something at a higher level, with the hope that someone else had figured out the headaches of low-level libHID implementation. There are many high level libraries built on libHID. But since there isn’t a whole lot of need for them in most computing, they tend to be abandoned, very old, simplistic, or all of the above. I also was frustrated that my attempts so far would lock me into only using a Linux machine, as my normal work environment at Bendyworks is Mac OSX. We pair all of the time, so I would not be able to use my chording keyboard whenenver I paired with someone else.
Plover
Another project that I found that seemed promising was Plover. At first glance, Plover doesn’t seem to be the right kind of software at all. It is an open source stenographer program that allows transcriptionists and court stenographers to turn a regular QWERTY keybord with n-key rollover into a high-end steno tool. The specialized hardware that court stenographers use can cost thousands of dollars, so an open source project that implements it for free on a $100 keyboard is a great win for those in that field.
Despite coming mapped for stenography and transcription — a system which I find very confusing — at its heart, Plover is a cross-platform Python GUI app that supports turning chords into words or phrases. This seemed like exactly what I needed. Going through the source code, I noticed that different keyboards got different configuration classes, and set about trying to create a class to map the keys on the Nostromo to the key events that Plover was expecting.
Now Plover comes with a huge dictionary of words that chords map to. And those chords are made up of certain key events, but not the ones we’re used to. (Some idea of how they look can be found here on Github.) How those special events combine and whether they come at the beginning or end of the chord seems to be the most important part of understanding this system. I struggled to understand the mappings, but it was pretty complicated. Plover comes with a giant, 124,000+ line JSON dictionary. I threw that out and started trying to write my own JSON dictionary; a humbler one that simply mapped chords to key events and a few Ruby & JavaScript programming idioms.
I struggled with understanding the key event names and how they combined (since I don’t have a background in stenography) and eventually, lost the work due to the VMware Linux VM crash mentioned above. Taking it as a sign that I should not continue down the route of using Plover, I put aside the chording keyboard project for many months.
Teensy and a return to hardware
Originally I had tried to avoid hacking hardware so that I could focus on what I do day-to-day: write software. But in the end, I felt like I had exhausted my ability to get this project off the ground by only writing software.
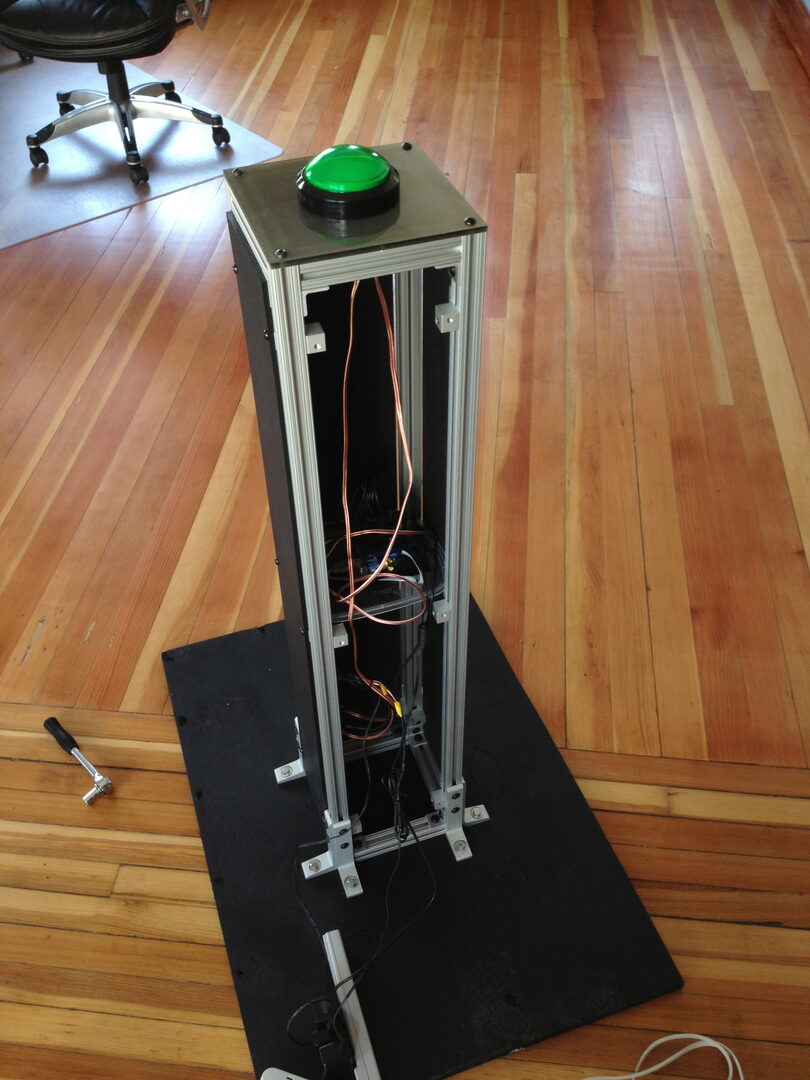
When we built the concert_cam project at Bendyworks, the first version of the button pedestal we built utilized a Teensy board — basically, a small Arduino-like microcontroller. The huge feature that the Teensy provides over other Atmel boards is that it comes out-of-the-box with a firmware that sets it up as a USB HID device.
The basic process for programming and using the Teensy is this:
- You program it in the Arduino IDE like other Arduino boards
- Anything you “println” will be sent as if someone had typed it on a USB keyboard.
- Additionally, there is a Mouse class that you can use to send mouse movement, click, and scroll wheel information.
- When you upload your code to the Teensy, it reboots, and immediately starts behaving like a USB HID device as far as the operating system is concerned.
For the concert_cam, it was easy enough to have a big arcade-style button send the keyboard event of “p” (for press) to the Raspberry Pi that the Teensy was attached to. A script on the Raspberry Pi watched for this keyboard input and told the camera to take a picture. It was very quick to get that working.
Here’s the concert_cam button pedestal with Teensy and Raspberry Pi getting wired in:
And some pictures of the Concert Cam in action:

Confident by my success with using the Teensy in the concert_cam, I decided to put a Teensy in my Nostromo, replacing the normal USB board inside it and translating keyboard chords into key press events at the hardware level.
The first step is to open up the Nostromo. This is pretty easy; just unscrew all the visible screws, and find & unscrew the other screws underneath the rubber feet of the gamepad. The Nostromo comes apart into three pieces, and looks like this inside:
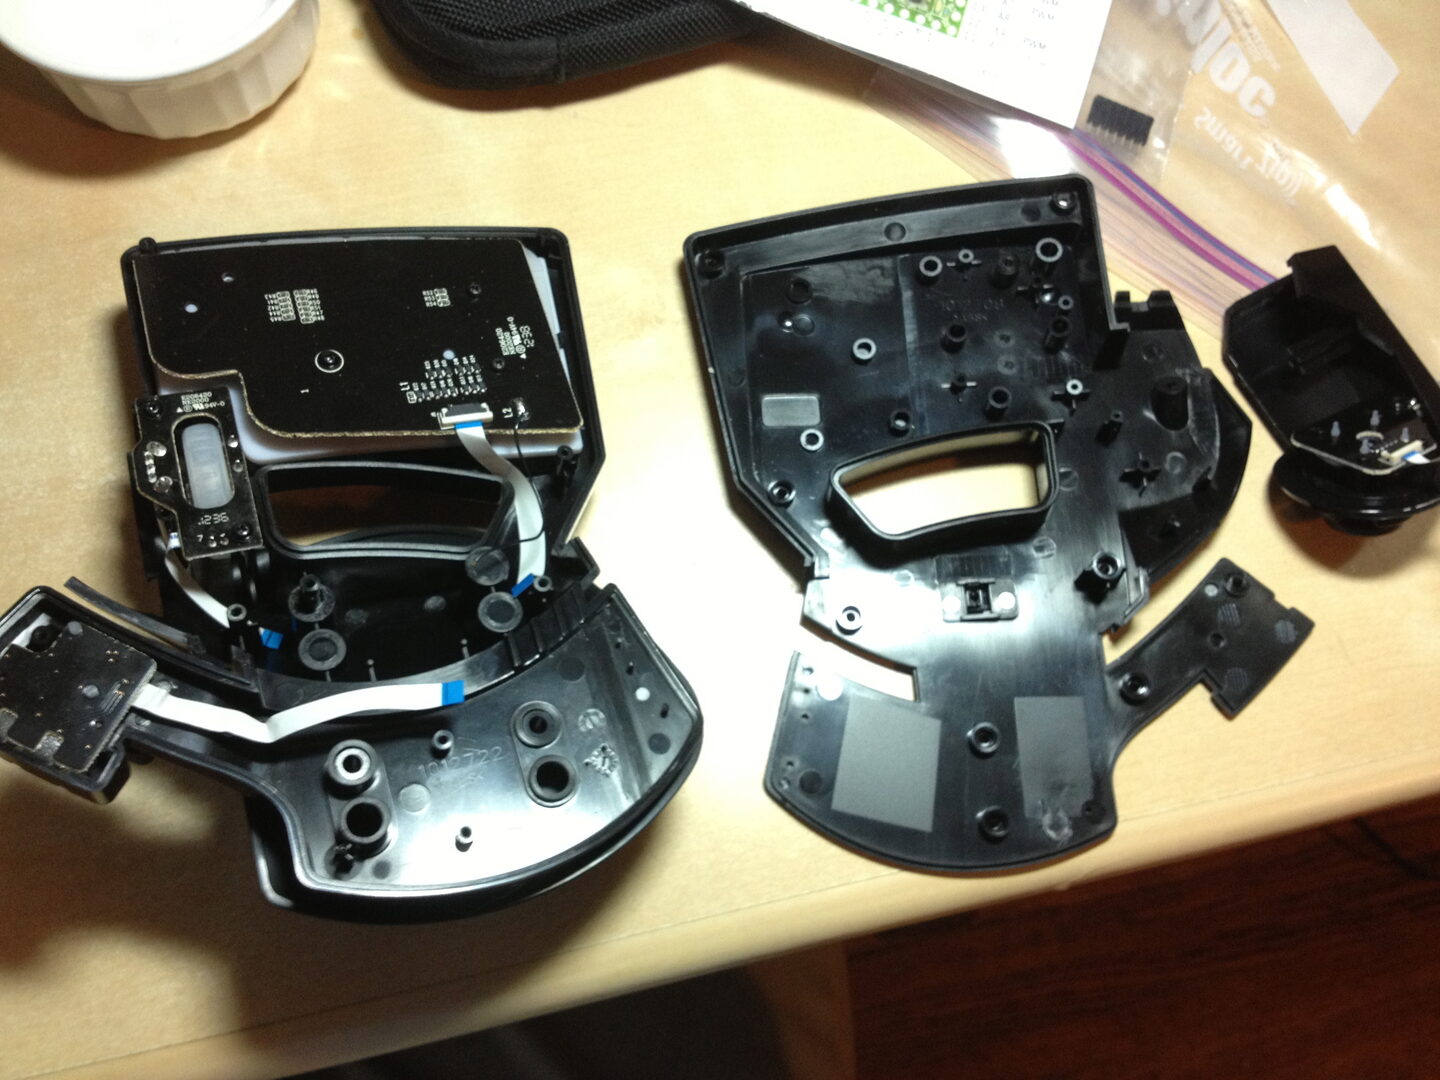
The first problem encountered is those little grey ribbons - they’re ZIF surface mount stuff, and everything else inside is surface mount here, too. For an electronics hobbyist, surface mount components can represent a big source of frustration. For me, I just didn’t want to deal with them. I can’t really solder to the cables with any precision and the spacing of the connectors was so small that there was no hope of attaching wires there. Further, the circuit boards had traces running inside but didn’t really have any pins that I could solder to. A real bummer.
I thought that maybe I could get more of the plastic cable connectors (the little white and black connectors on the main circuit board), but with a regular pin spacing, not surface mount. All attempts to find such a part were unsuccessful. So I had to get creative.
The Nostromo uses membrane keys, which most laptop and PC keyboards nowadays do. A long time ago, almost all keyboards used “mechanical” key switches – switches that had springs or other tension devices and sent a keypress when continuity was made between two contacts. The loud, much-loved IBM Model M keyboard counts as a mechanical keyboard. Gaming keyboards and a few hardcore programmers (like many of us at Bendyworks) are holdouts for using mechanical keyboards, and a few companies still make them. For mechanical key switches, the current winner is the Cherry MX line. (To learn more about mechanical keyboards and Cherry MX switches, I recommend this guide.)
Cherry MX key switches are not all that expensive, and I’d only need 15 to convert the Nostromo. I put in an order for the Cherry MX browns from wasdkeyboards.com and they shipped them out fast. I figured I could get away with using the keycaps from a number pad, which are also cheap, and so I threw those into the order as well.
However, by replacing the key switches, I was getting into a realm of hardware hacking that I was trying to avoid: fabbing physical things from scratch. For this project, I wanted the keyboard to be sturdy and reliable; I didn’t want it to fall apart or move under my hand or rattle. Making a mounting plate that they keys snap into is the typical way that hobbyists build their own mechanical keyboards. And lots of people do, over on sites like deskthority.net and geekhack.org, but without a really well stocked workshop or a Makerspace membership, I didn’t want to go down that road.
Luckily, some quick googling turned up a forum post in which the author replaces Nostromo key switches with Cherry MX keys. The mounting plate for the membrane keys in the Nostromo requires only a little dremeling to convert. Since I was also throwing out the existing USB circuit board for the Nostromo, I can get away with removing the membrane switch PCB and soldering a cable directly to the Teensy’s pin headers, getting rid of those pesky ZIF cables.
Currently, I’m waiting for the key switches to arrive so that I can cut down the white mounting plate for each switch. My plan is to wire up each key to an IO line on the Teensy. Typically, keyboards use multiplexing in a grid to let the computer know which key was pressed: essentially, rows of keys are connected to one set of pins and columns of keys are connected to another set of pins, and when a pin for a row and a column goes HIGH, you know which key was pressed based on it being the intersect of that row and column. The issue you run into here is, again, complicated by chording. While the microcontroller can figure out reasonably well individual keys, there are issues on some keyboards with “ghosting” other keys when chording.
Since I only have about 15 keys and maybe another 4 or 5 input/outputs that I need, I can get away with using separate IO lines on the Teensy 2.0. The Teensy++ 2.0 has are even more IO lines, which would make it better suited to projects with more IO lines needed. Not needing diodes to ground, not having to wire up a matrix, and not having to detect two pins makes both the hardware and software here much simpler.
Scroll wheel
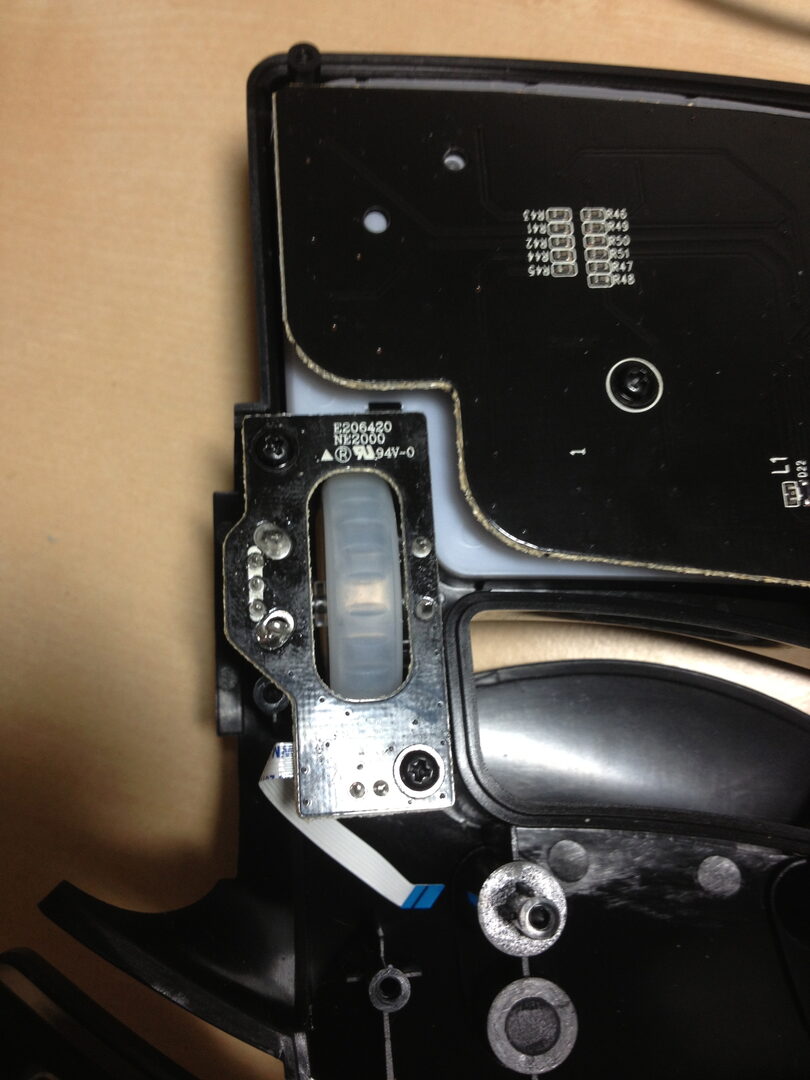
While waiting for the key switches to arrive, I began work on the one non-surface-mount component in the Nostromo that I could solder to: the scroll wheel. On the scroll wheel’s PCB, there is a mechanical encoder, a button (the click when you press down on a mouse scroll wheel) and an LED.
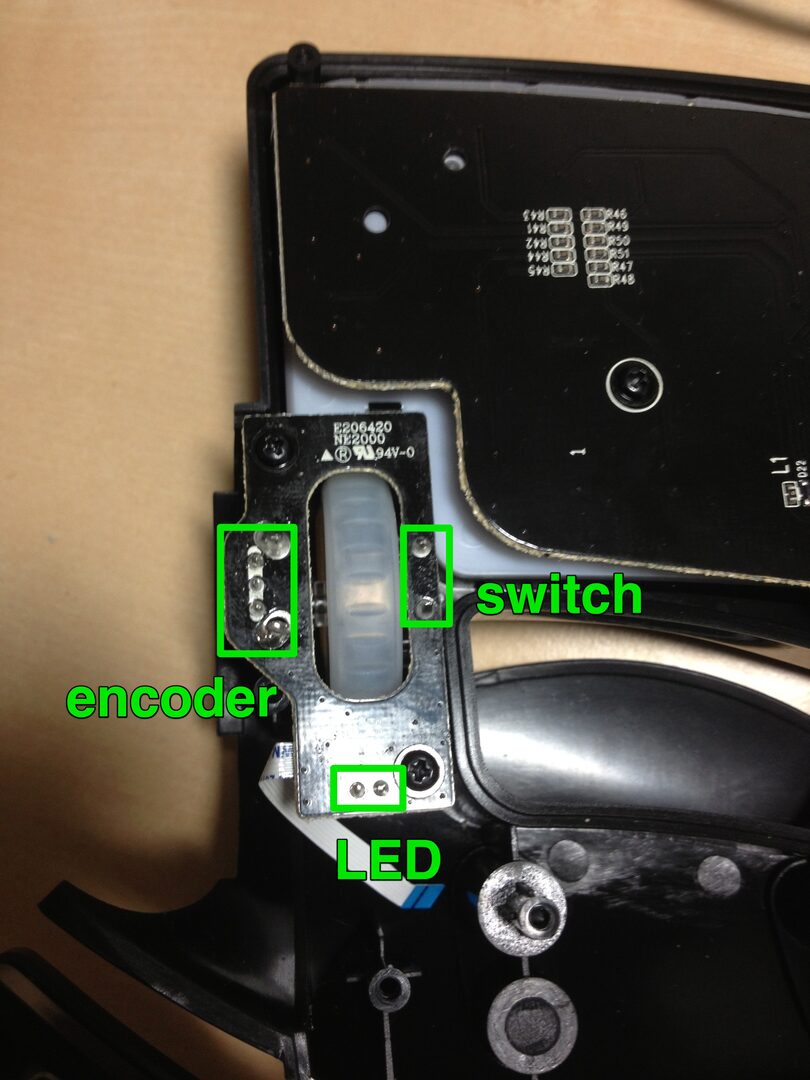
Here’s a quick link for reading up on how mechanical encoders work in mice, and particularly, how to interface one with an Arduino: Mouse Scroll Wheel Sensor and Arduino. There’s also some source code in that thread that will probably prove useful later. Note in the picture that the middle leg of the encoder is ground, and the two ends correspond to the signals sent when you rotate it — you’ll have to figure out whether the scroll direction matches their location yourself by experimenting.
I used part of my Friday Growth Day at Bendyworks to start wiring up and coding the firmware for the Nostromo’s scroll wheel. The basic idea is that the mechanical encoder has two outputs. You monitor both lines on separate IO pins on the Teensy, and whichever IO line goes HIGH first is the direction of the scroll. With the Teensy’s convenient Mouse class, you can then just send a scroll event to the OS. In a matter of minutes, I had my scroll wheel scrolling web pages. Not bad.
I’ll be implementing a variation on the sliding buffer for key events, so I will probably also use that code for handling scrolls (over a much shorter, separate buffer.)
Since I was trying to understand the mechanical encoder and could only really connect alligator clips to one pin at a time, I wrote up a quick Arduino script to detect only one direction of scrolling. Here’s that code:
/*
 * scroll wheel
 */

int previousVal = 0;
int val = 0;
int ledPin = 11;
int scrollWheelPin = 10;

int velocity = 10;

void setup() {
  Serial.begin(9600);
  pinMode(scrollWheelPin, INPUT_PULLUP);
  pinMode(ledPin, OUTPUT);
  delay(1000);
  Serial.println("All set");
}

void loop() {
  val = digitalRead(scrollWheelPin);
  if (val != previousVal) {
    Serial.println(val);
    digitalWrite(ledPin, val);
    Mouse.scroll(-1 * velocity);
    delay(300);
    previousVal = val;
  }
}
In my repo on Github: scroll_wheel.ino
Note that this does not implement a sliding buffer or direction detection.
Eventually, I’d like to break my scroll wheel code out into an Arduino library that takes the two input pin numbers and a velocity as parameters to the constructor, and implements the scroll direction detection. The library would send the scroll event for you based on the velocity you passed in. But that will have to come later.
Future work
I’m going to be getting the key switches in the next week and beginning the hardware hacking to install them.
On the software end, I’d like to write a script (probably in Ruby) that takes a standardized keyboard mapping file and converts it into a C++ header file that the Arduino can utilize for its chord mappings. That way, I don’t have to maintain the header file manually or know what C++ constants map to what, I will simply edit my simple key mappings file and regenerate the code.
The twiddler_keymap.txt file in the repo represents the current plan for my keymap. It is based on the Tabspace layout mentioned above in the Background section. I haven’t found any reason to not use the Tabspace layout, as it seems sensible and leaves plenty of room in the unmapped chords for me to implement key combos, programming language idioms, and text editor movement.
One last decision I need to make is whether to replace the Nostromo’s thumb directional pad. The current thumbpad uses membrane switches similar to the keys, and is all surface mount with very little access to its signals. One thought is to replace the 4-way pad with a Playstation-controller style joystick from Sparkfun.
With this joystick, I’d be able to implement either mouse movements or arrow key movements, and could probably toggle which it behaves like with the small button located above the directional pad. However, securely mounting the joystick into the Nostromo case so that it is durable might prove an issue. I’ve put off making this decision until I have successfully hacked the mechanical switches in.
I’ll be blogging about each step of finishing this chording keyboard as I go. Stay tuned for the next post about installing up the key switches and wiring them to the Teensy.
Final thoughts
I’ve got a lot of projects, and I put them down regularly to focus on something else. That list of projects continues to grow and grow. So I don’t feel very guilty that I’ve put down this project for awhile and am just now picking it up again. I’m making good progress, and find it interesting rather than frustrating, so I will continue work on it.
In truth, this project doesn’t really represent much value outside of the things I’m learning as I go. I have no ambitions of turning this into a commercial product, and while some people might find my notes here useful, I’m not trying to make a repeatable project that others can build part-for-part. Is it worth it? Definitely. Is it for everyone? Probably not.
One thing I’d like to do after completing this device is begin work on a custom computer. Specifically, I want to learn enough digital logic concepts to design a whole computer in a language like Verilog or VHDL, and then burn the design into a FPGA board.
Such a computer would not be intended to compete with your Core i7 quad core – I’m thinking of implementing a unique architecture with the overall processing capability of something like an early 80’s microcomputer. It would be interesting, but not entirely useful for day-to-day computing.
When the computer is built, I’d begin implement an operating system on top of that computer in Lisp, along the lines of what the author of loper-os.org has been working towards for many years.
Such a project may take a decade or more to realize, though, and so is not undertaken lightly or easily accomplished.
If you have any questions, comments, or your own chording keyboard project, I’d love to hear about it in an email.